The Background
As some might know, I recently took a step forward in my life and became a home owner, but given I am a Linux nut and IT-Guy and the former owner left behind a 19 inch rack, it became clear very fast that a new server needed to be bought and installed, both as a testing ground and to host a bunch of tools and software I daily use. I got my hands on two used Asus servers sporting 32 GB Ram, 4TB HDD and dual Hex-Core Intel Xenon CPUs. All in all very fine machines.
The goal here is to run a couple of kvm vms on them as well as some docker containers to make my admin life a bit easier. That was in the beginning of September, we are now at the end of October and I finally managed to set up a stable system….
First issues
About two weeks after I got the hardware I finally found time to start setting it up, flashed Ubuntu 20.04 LTS server on a usb-drive and:
It didn’t boot.
After playing around with the BIOS for a bit and some web search later, the result was, the machine simply wouldn’t boot form usb, but luckily it sports a DVD drive. Burned the image and voila Ubuntu booting!
But not getting an IP address, strange, unplugged the cable and replugged, IP there, ok move on.
But it was no ok, on every single boot the eth interface was down and I was not able to get it up from the OS only chance: unplugging and replugging of the ethernet cable.
Back to the BIOS, web search, everything. This issue is unsolved to this day. After two days I simply gave up and borrowed a network card from the company, installed it, all fine, so I ordered myself two cards and put the project into storage until the cards arrived.
A change of mind
Ubuntu, to me, is one of the best Linux Distributions out there and I am a proper fanboy, but given some minor problems in 20.04 desktop and a couple of issues upgrading my 19.10 virtual servers to 20.04 resulting in damaged vms, looking around surely didn’t hurt.
One of the distributions I was eying for some time is Fedora. I have been running it on one of my laptops for some time now without any issues. I figured if RedHats test and experimenting OS was that stable looking at RHEL 8 surely wasn’t a mistake, right?
But given I am running a private home server here, buying into RHEL 8 seemed a bit expensive and given that CentOS 8 is basically RHEL 8 I went with it. Looking at their homepage and seeing that I would be getting updates for this release until 2029 sold me, I would not be needing to alter that machine for some time, great!
First install and boot
I am not going to go into too much detail about the install process here, it is very well documented on various easily discovered sites on the web, but here a a couple of things I did so you can follow this post and know why things happened or were done.
First up: I set the included adaptec raid controller to treat the HDDs as simple drives. I am doing this so that if the card dies on me I can run these disks on any other computer and recover data from them. No this is not my backup plan, but it doesn’t hurt to have one more option up you sleeve if things start going wrong.
Second, I removed all drives but the first one from the tray, so I could make sure the OS was installed on the correct drive.
Third, CentOS suggested partitioning the drive so the /home folder was mounted as a separate partition. I am not going to have any need for the /home folder so I altered it, only one partition mounted to / for me.
Fourth, this is a minimal install, no desktop environment needed, just libs for mounting network shares, ssh,kvm and cockpit (I will get to this later).
As you can imagine the installation did not take long, so the OS booted for the first time, showing the OS version, Kernel version and prompting me to login to holodeck01 (yes, that is my machines name and I stand by it)
Setting everything up
Given I already installed ssh during the initial setup I went ahead and checked my dhcp for the servers IP so I could do everything from the comfort of my desk from hear on. At this point, please imagine an IT-Guy rubbing his eyes in disbelieve as he can’t seem to find his new machine anywhere on the lease table, taking of his glasses, rubbing his eyes and rechecking. Not there. Going back to the server all networking LEDs are blinking, full on, Gigabit connection on both switch an server. Local logon no IP, nothing. Rubbing eyes again.
Off we go to the internet, result: RHEL8/CentOS8 runs on network manager, something I haven’t used yet as Ubuntu is on Netplan, no big deal.
Network manager comes with a nice little command-line tool, nmcli.
Step 1: nmcli connection -> this lists all you available ports. All there, great!
Step 2: Modify the connection so it is up, I don’t want my machine to go via dhcp but rather give it a static ip anyway. so here are the commands used:
nmcli con mod <interface> ipv4.addresses <ip address/prefix>
This sets the IP
nmcli con mod <interface> ipv4.gateway <ip address>
Sets the standard gateway
nmcli con mod <interface> ipv4.dns <ipaddress>
Sets the DNS Server
nmcli cond mod <interface> ipv4.method manual
Tell neworkmanager that we will be running a manual/static configuration
nmcli con up <interface>
Activate the connection. Pinged a couple of addresses, all fine?
No, not all fine, one reboot later no IP no connection.
Digging a little deeper, I found that nmcli writes config scripts to be place under:
/etc/sysconfig/network-skripts/ifcfg-<interface>
Did a cat on this file and saw one line: ONBOOT=no
Changed it to yes and rebooted the system and we are online!
Here is a a piece of advise for the aspiring Linux admin, actually for anyone using any pc. After you changed something reboot your system and make sure everything works as intended, if you change to much and something goes wrong after the reboot, good luck finding out which change it was.
Cockpit
One thing I was looking forward to was using cockpit. Cockpit is a web UI for managing servers and comes installed by default on CentOS 8 only step needed to run it:
systemctl enable –now cockpit.socket
The interface runs on port 9090 of you server and you are greeted by something like this:
Given 3 of my 4 drives are not formatted as of yet I went ahead and installed the storage management tool right away and restarted cockpit
dnf install cockpit-storaged
systemctl restart cockpit.socket
And to little surprise, I saw my drives in Cockpit. Since I lied just a little bit and did format them in Ubuntu before, on the next screenshot you will be seeing volume names.

Anyway, I reformatted them in cockpit
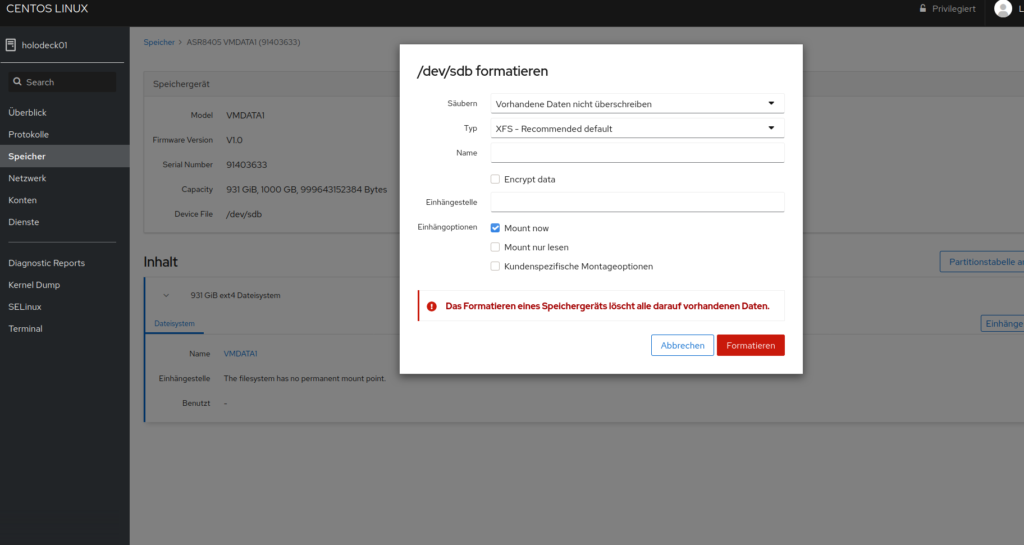
All in Ext4 and mounted to /mnt/VMDATAx, x being the number of the drive, resulting in this screenshot:
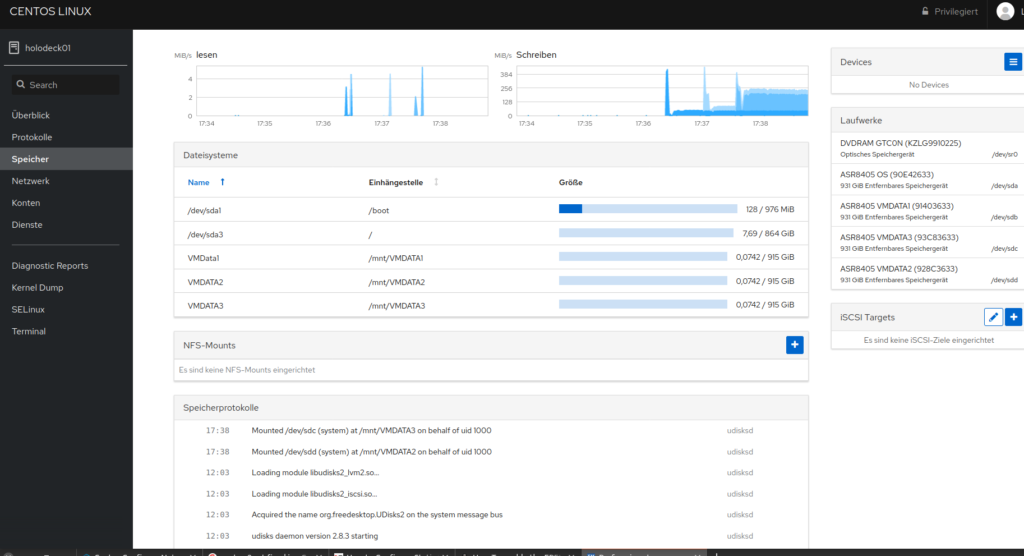
Did a quick reboot afterwards, result:

All drives mounted, so the system was now ready for me to start working with it.
At this point I should mention, that cockpit and all its modules are available on most distributions and are not a REHL/CentOS 8 exclusive.
Virtualization
As you might remember, the point of this system was to run a couple of virtual machines. And with this being a RedHat based system and my preference anyway, we’ll be going with KVM as a hypervisor. Having installed this, during the setup process all that was needed now was the cockpit package. Easily done, one command line:
dnf install virt-viewer
As I keep saying, reboot after every change, so do so now.
And it was good to reboot, because nothing happened, turns out installing kvm properly takes a little more than one checkbox during install, so here we go:
dnf module install virt
dnf install qemu-kvm libvirt virt-install
systemctl enable libvirtd
systemctl start libvirtddnf install virt-install libguestfs-tools
systemctl enable libvirtd.service
systemctl start libvirtd.service
Afterwards enable and start the service, also, again, reboot…
And we have nothing….
Turns out I missed one crucial command somewhere along the way
dnf install cockpit-machines
One reboot later and we can manage virtual machines from cockpit

Docker
Having KVM and Cockpit running the way I want it, docker was the next and final step for this post.
First, enable the docker repo:
dnf config-manager –add-repo=https://download.docker.com/linux/centos/docker-ce.repo
Second, install docker
dnf install docker-ce
And, as always, reboot your system…
Afterthoughts
It took me some while to get this system running, hardware delivery issues, strange bios things and a new OS I never worked on, but with kvm and docker running, CentOS 8 uses 500 MB of RAM, which at first I considered a mistake in display or me missing something on install. But no, the system doesn’t need more.
After the first troubles, caused by me not knowing the system, everything is up an running, Better than ever before.
I tried causing damage to the system, writing to the hdd while pulling the plug etc. Did not manage to cause any issue preventing it from booting, yet….
All in all, I would say, that CentOS 8, although taking me some time to set up, is one of the most stable and manageable Linux systems I have worked on so far and I am looking forward to setting up the first VMs and Containers after these initial test. And of course writing about my experiences here.